Frequently Asked Questions
Troubleshooting Communications Issues
Establishing a serial communication link should be fairly easy. Connect the cables and set the data protocol. But things do not always work according to plan. The suggestions below should help resolve most communications issues.
This document does not contain switch settings for setup instructions for specific models or manufacturers. Consult the device manual to make sure it is functioning properly.
The processing speed and buffer memory of the device determine the acceptable speed of the data stream. The RFC-1/B defaults to 2400 baud. This is slow compared to network speeds but fast compared to many printers. The RFC-1/B can be slowed to 300 baud so that it does not overload the buffer of slower devices.
The RFC-1/B data protocol is fixed at 8,N,1. That means 8 data bits, no parity bit and 1 stop bit. Hardware handshaking should be disabled or set to Xon/Xoff mode instead of DTR mode.
Using local devices:
- Serial printer
- Parallel printer
- USB printer
- No data prints
- Characters are garbled
- Characters are missing/dropped
Using remote devices:
- Modem connections
- Modem Auto-Answer LED turns off
- RFC-1/B does not answer the telephone
- Modem cannot establish connection
- Modem cannot establish connection–communications mode 2
- Modem cannot establish connection–high-speed fax/modem
- Characters are garbled
Local Devices
Local Serial Printer
Installing a printer at the transmitter site to log readings requires only a serial printer and the appropriate data cable. The RS-232 port is a DTE device. The printer should be a DCE device.
Some printers have a switch to set DTE/DCE. Set the printer to DCE if this is an option and use a straight-through cable. If the printer is a DTE device then use a null-modem cable.
Local Parallel Printer
Parallel printers can be used with the RFC-1/B but the data stream from the RFC-1/B must first be converted from serial to parallel. A passive cable adapter is not sufficient. The data must be electronically converted to the appropriate format. Some printer manufacturers offer a serial input as an option.
External devices are available RS-232 serial data to parallel data. These can be found and ordered online. A web search should turn up several options.
Local USB Printer
USB printers are not compatible with the RFC-1/B. Unlike their serial and parallel counterparts, USB printers do not have a built-in character set. USB printers rely on the host computer to process the page data and the manufacturer must provide a print driver for the operating system. This level of processing is beyond the capabilities of the RFC-1/B.
Local Printer–no data prints
This usually indicates that something big and, hopefully, obvious is wrong. It may help to take a break for a few minutes to gain a fresh perspective.
- Verify that power is supplied to all devices.
- Verify that cables are intact and attached to the appropriate devices.
- Check cables for continuity and shorts.
- If the device is DCE use a straight-through cable.
- If the device is DTE use a null-modem cable.
- Verify that the internal jumper between the RFC-1/B and the RS-232 adapter is installed properly. The connectors should be seated firmly in the sockets and all pins must line up correctly.
The relationship between DTE and DCE may require clarification. The proper arrangement is shown in the following diagram.
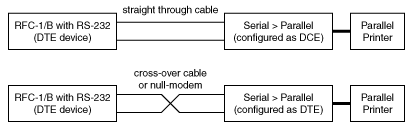
RS-232 DTE and DEC connection
If DCE/DTE is a DIP switch or jumper selectable option, try the other position. If it is not selectable or you do not know how the device is setup, try a null-modem cable.
Local Device–characters are garbled
Garbled data usually indicates that the devices are attempting to communicate with different speed or protocol settings. Data is transferring so the cable configuration and DTE/DCE arrangement are probably correct.
- Verify that all devices are using the same data rate (baud).
- Verify that all devices are using the same data protocol.
If a serial/parallel data adapter is in use then it must also use the same data rate and protocol.
The RFC-1/B data protocol is fixed at 8,N,1. That means 8 data bits, no parity bit and 1 stop bit.
Local Device–characters are dropped
Incomplete data is often indicates a buffer overflow–too much data is being transferred to the device and it cannot keep up. Printers typically have small buffers that will fill quickly if the printer is not fast enough. The RFC-1/B continues sending data to the device and data is lost when the device cannot process it.
- Slow the baud rate all devices down (to 300 baud).
- Disable hardware handshaking in external devices.
- Use a quality, shielded cable for data transmission.
- Use the shortest cables possible between all devices.
- Ground the data shield. Use a bypass capacitor!
Keep in mind that most of these devices were designed for small office environments, not RF heavy transmitter sites. RF may interfere with the data signals passing between devices.
Remote Devices
Remote Device–modem connection
The RFC-1/B is compatible with "AT" command set modems. Connect the modem to the RFC-1/B using a straight-through data cable. Connect the devices as shown in the diagram below.
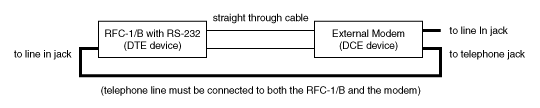
Data cable connections to RFC-1/B
If the modem does not have a loop-through jack for an external handset, use a "T-connector" to split the telephone line to both the RFC-1/B and the modem. It is absolutely necessary that the telephone line be connected to both devices.
Most AT command set modems have similar factory configurations and many will work with the RFC-1/B with the default settings. It is not possible to test every modem for compatibility or configuration so you may need to consult the device manual for settings.
Modems are almost obsolete but they are still common in industrial and utilities. A 2400 baud industrial modem is the best choice for an RF environment. The Zypex ZM24x is one possibility. It is a little pricey but it has lightning and surge suppression built in and it connects quickly.
Try to make the modem as simple as possible. The idea is to establish a relatively slow but reliable connection. The RFC-1/B does not use or require data compression. It does not transmit enough data to matter. Some modems require the default parameters to be changed before they will work reliably with the RFC-1/B.
Sine Systems maintains a demo transmitter site for those who are interested in testing the operation of an RFC-1/B in voice mode or data mode.
Remote Device–Auto Answer LED turns off
The auto-answer LED "AA" should turn off when the RFC-1/B powers up. This is normal behavior. The modem connected to the RFC-1/B should not have auto-answer enabled.
The RFC-1/B controls when the modem answers the line. Modems with auto-answer enabled will disrupt system behavior possibly resulting in failure of both voice and data mode communications.
Remote Device–RFC-1/B does not answer
The RS-232 adapter does not interfere with normal voice operation of the RFC-1/B. The RFC-1/B should answer the line on the programmed ring number even with the RS-232 adapter installed.
- Verify that all telephone cables are connected.
- Verify that the telephone line is working.
- Connect the telephone line to both the RFC-1/B and the modem.
- Disable the "Auto-Answer" function of the modem.
If you are using the loop-through jack on the modem, try using a "T-connector" to split the telephone line instead. Some modems control the accessory telephone port and will disconnect the line. The telephone line must be connected to both devices.
Remote Device–cannot establish a modem connection
If you do not hear the remote modem carrier tones coming from the speaker of the calling modem, the problem is probably power or cable related. If you hear the carrier tones then the modems are attempting to connect. This is good but several things may cause this kind of failure.
Most modems auto-adjust the baud rate to match the incoming data. Very early modems may require a switch setting to set the data rate.
Some modems are blind for several seconds after power up. To see if your modem is, use the following test:
- Apply power to the modem.
- Wait a several seconds.
- Apply power to the RFC-1/B.
- Watch for data LEDs to flash on the modem.
The RFC-1/B sends initialization commands to the modem at power up. The LEDs should indicate that the command is received and acknowledged.
Verify that the RFC-1/B communication mode has been set to recognize the newly attached modem. Data mode is not enabled in the factory settings.
The communications mode must be programmed to activate the data accessory. This is controlled by programming at address 1002 in the RFC-1/B. Consult RFC-1/B manual for programming information. Once set, the RFC-1/B retains the setting even if power is lost.
Verify that the modem connected to the RFC-1/B is attempting to connect. Call the RFC-1/B from a telephone not via modem. Listen for the squeal of the modem carrier tones. If you do not hear the tones then the devices are not communicating.
- Check all cables including power supplies.
- Verify that the communication mode is programmed correctly.
- Verify that the internal jumper between the RFC-1/B and the RS-232 adapter is installed properly. The connectors should be seated firmly in the sockets and all pins must line up correctly.
If you do hear tones then the RFC-1/B is trying to connect. The problem is likely at the calling end.
- Verify the data rate and protocol settings.
- Verify modem connection and communications software settings for the modem.
- Disable data compression and error correction in the calling modem.
The communication software must initiate the call at the same baud rate as the RFC-1/B. If it is not, the modems may establish a connection at another baud rate. Communication between the RFC-1/B the modem will be lost.
Dumbing things down
The goal is to force the modems to communicate at a preset baud rate through the entire communications link. To accomplish the goal, shut down as many performance enhancing features of the modem as possible. Also try to disable fax capability so that it does not interfere with the connection.
At the calling computer there are a couple of commands that often simplify things.
- "AT&QØ" disables data compression.
- "ATS7=12ØX2&QØ" adjusts the connection timeout window, disables error-correction and busy signal detection.
If these commands help, most communication software will let you set the modem initialization string so that it will automatically configure your modem when you run the software.
The modem connected to the RFC-1/B needs to be forced into a mode where it is as unsophisticated as possible. The commands to disable features vary between models (usually by chipset). The commands below have worked with many modems.
The RFC-1/B defaults to 2400 baud so we will assume that data rate. Set the communications software to operate at the same speed so that the signal path is consistent.
The following commands must be issued to the modem that is attached to the RFC-1/B. Obviously, this cannot be accomplished in the normal operating setup. Connect the modem to a computer with software that allows you to send commands directly to the modem.
To test communication with the modem, type "AT" [enter] into the terminal/communications window. The modem should respond "OK".
Issue the commands to the modem one at a time. If the modem responds "OK" then the command is valid. That does not mean it works. It simply indicates that the modem recognizes the command.
If the modem responds "ERROR" then the command is not valid. Make sure that you typed the command correctly. Do not confuse forward and backward slashes, "/" and "\".
Read the manual! The following list of commands is far from exhaustive. The modem manual has specific commands for that model.
- "AT&F"–restore factory default settings
- "AT&F&WØ&YØ"–restore factory defaults and write to memory
- "ATV1"–respond with verbal replies--not numeric
- "ATNØ"–do not step up to higher baud rates automatically
- "AT&QØ"–communicate with RFC-1/B and telephone line at same speed
- "AT\NØ"–disable fax capability in some modems
- "ATS37=Ø"–use the same baud rate that the RFC-1/B sends 'AT' commands
- "AT&WØ&YØ"–write current setup to memory and activate on power up
Issue the command(s) for the setup and store the modem setup to its non-volatile memory before removing power. Then reconnect the modem to the RFC-1/B. If you do not store the setup to memory it will be lost when you remove power from the modem.
Remote Device–cannot establish a modem connection
RFC-1/B using communication mode 2
The calling modem is probably not waiting long enough for the RFC-1/B to cycle through the voice prompt and tell its modem to connect. Add the command "ATS7=12Ø" to the setup string on the calling modem. This should allow plenty of time for all of this to take place and establish a connection.
The following modification applies only to very early models of the RS-232 Serial Data Adapter. These models have bone colored board instead of green.
If the RFC-1/B hangs up before its modem comes online, try establishing a connection using communications mode 3–data only. If everything works normally then there may be a problem with the modem not waking properly. Some modems are confused when the RFC-1/B powers up the RS-232 adapter to switch between voice and data mode.
Installing a 560 or 620 ohm resistor from the modem receive data line to ground (pin 2 to pin 7) often eliminates this problem. There is often room to install the resistor inside the protective hood at the modem end of the data cable. This modification can also be made on the RS-232 adapter board.
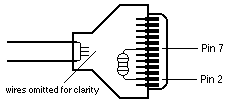
Resistor installed in cable connector
Modem reports "BUSY"
The RFC-1/B voice prompt "Enter" confuses some modems and they report that the line is busy. Disable "BUSY" line detection with the command "ATX2". If this does not work, try "ATX1" or "ATXØ".
Modem answers on voice mode calls
Disable auto-answer on the modem. Some modems use switches, others require a setting adjustment to be stored in memory.
If the modem setup is stored in ROM:
- Connect the modem to a computer and boot terminal software.
- Issue the command "ATSØ=Ø" to disable auto-answer.
- Issue the command "AT&WØ&YØ" to write this information to memory.
Remote Device–cannot establish a modem connection
Calling modem is high-speed, fax modem
Most high-speed fax modems have built-in error correction and/or data compression. When establishing a connection, high speed modems send extra tones to see if the receiving modem knows how to match these speed enhancing features. Unfortunately, the tones confuse the RFC-1/B and it hangs up.
Issuing the command "AT&QØ" to the calling modem should stop it from sending the extraneous tones.
Remote Device–data is garbled
Garbled data usually indicates that the devices are attempting to communicate with different speed or protocol settings. Data is transferring so the cable configuration and DTE/DCE arrangement are probably correct.
- Verify that all devices are using the same data rate (baud).
- Verify that all devices are using the same data protocol.
The RFC-1/B data protocol is fixed at 8,N,1. That means 8 data bits, no parity bit and 1 stop bit.